We have to make some apologies to people waiting for their orders or questions to be answered, as we’re coping with a huge backlog.

We’re (still) finishing the new ByteDelight HQ, which is now almost done.
At the moment we’re working in a tiny workplace, which is far from efficient.

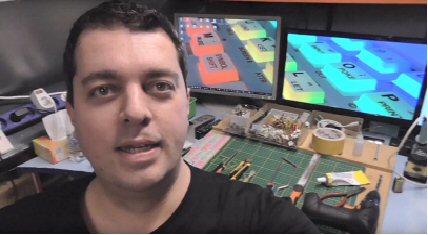
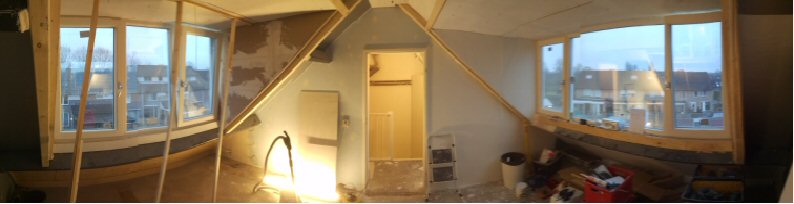
Here are some photos of the progress, starting with the old working corner (and me):

2 large dormers were installed 2 weeks ago:

A couple of days ago the main painting was finished, and on this photo we were still working on the desks:

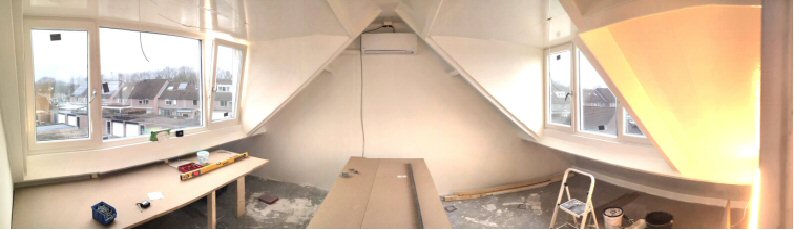
Also an AC was installed to stay cool at summers.

The work is almost done: the desks are completely installed now.
That took more time than expected because of some custom build-up parts on the desks, but those are also assembled.

Remaining things todo at this moment are:
– Painting of the desks and build-up parts
– Installing the floor

Should be done in a day or two.
After that we can finally install ourselves in the new ByteDelight HQ, and get back to full speed and service again – and lots of new products!

If you like to see the result, stay tuned here at ByteDelight.com for the update that will come in a couple of days, or head over to Facebook where we post updates regularly as well.

Ben Versteeg

Dual Floppy Drive set improvements

The Dual Floppy Drive sets are still selling well.
I keep ordering new old stock drives from time to time.

Do you know how much effort is put in to manually craft these?
Let me show you.

Also, I’ve made some small improvements today because of some feedback I received, take a look!

The photo above shows some of the tools used to manually craft each of these Drive sets.
The Dremel and saw are used to carefully cut ot the front hole, which is then filed.

The first improvement I will make from now on are adding two spacers: because of how the set is assembled, often the space between the shells at the front is slightly bigger than at the back.
The two spacers make sure the distance will keep even in the future:

This is the result:

Another improvement is the way I fix the Floppy ribbon cable.
In the past I used glue on both sides of the cable at the shell edge, which was noticeable from the outside.
I will use super glue inside only, to mount the cable to the case:

As you can see in the photo above, I solder the power wires directly to the drives.
Using a connector may cause problems in the future, especially since the drives are not meant to take apart.

You may wonder why it can’t be taken apart. Well, that’s easy: there is no better suitable case on the market for these drives.
I’ve looked over and over again, but this is really the best (standard) case.

But the screw holes at the front of the this case are to close to eachother to have the drives in between.
That’s why I cut and file away the screw holes.
To be able to close the case, I use double adhesive tape, which makes it fit perfectly.

After completing the assembly, the result is this:

Hope you like it!

There are a lot of enthusiasts that still like working with Floppy disks.
It’s a true nostalgic experience.

These Dual Floppy drives work with any Shugart (retrocomputer) Disk interface.
So for ZX Spectrum Disk interfaces, but also for Sinclair QL, and lots of other brands like BBC.

Get over to ZXSpectrum.shop to order one!

USR0 mode and the lack of +3 BASIC support with ESXDOS explained

I often get the question if people can still use the floppy drive on a ZX Spectrum +3 in case they order a DivMMC EnJOY! interface.
So let’s find out.

Accessing the floppy drive on a ZX Spectrum +3

To access the floppy drive in a ZX Spectrum +3, you need the commands that are available in +3 BASIC.
When you enter 48 BASIC, these commands are unavailable, so you really need +3 BASIC.

ESXDOS and USR0 mode

ESXDOS, the firmware for any DivMMC interface, currently only supports 48K BASIC in USR0 mode.
USR0 mode means you will have all the 128KB memory and the 3-channel sound available, but +3 BASIC is not enabled.

ZX Spectrum toast rack, +2 and +2A

The black ZX Spectrum +2A uses the same ROMs as in the +3 so also has +3 BASIC, and the toast rack and grey +2 use 128 BASIC.
All of these enhanced BASICs are disabled once booting wth ESXDOS into USR0 mode from a DivMMC interface.

Will ESXDOS support 128 BASIC or +3 BASIC in the future?

It doesn’t seem so.
The focus is on new features like RTC support and Long FileName support, but since there are not many people involved, speed of development is well, let’s say, not as high as many wish for.

So can the floppy drive be used with a DivMMC interface or not at all?

Yes, it is possible, but.. not easy and very limited.
Currenly the only way of using +3 BASIC with the DivMMC, is by using the +3e ROMs.
The +3e ROM modifications introduce its own way of formatting and using the SD card.
It’s far more complicated to use compared to ESXDOS, and will not support .TAP or snapshot files.

But.

If someone would just write some DOT-command that mimics the +3 floppy drive commands, that would be great.
A DOT-command is the flexible way of adding BASIC commands to ESXDOS, and since the floppy hardware is simply still present and available on a +3 when a DivMMC interface is connected, why not use it?

Hey, maybe if I find the time for that myself some day..

New “NMI Navigator” (NMI.sys) for ESXDOS

Out of the blue david_ps on board.esxdos.org has developed a new NMI system for ESXDOS.

The most important new features:
– Support for Kempston joystick
– Poke feature from NMI navigator
– Support for .ROM games (JetPac, Cookie, etc!) since NMI Navigator version 0.0.16
– Extra features to load TRD files
– Mount up to 4 TRD drive images!
– Smaller font – now let’s hope ESXDOS 0.9 with LFN is out soon (Long File Name support should be integrated into ESXDOS first before it can be used by the NMI Navigator).

Keep an eye on his ESXDOS Board thread for future updates: http://board.esxdos.org/viewtopic.php?id=94.

GREAT WORK DAVID!


Update Sep 2019 – NMI Navigator for ESXDOS 0.8.6 and ESXDOS 0.8.7

For ESXDOS 0.8.6 and 0.8.7 you need NMI Navigator version 0.0.16.

This version exists of:
– The NMI.sys main file
– A ‘NMI’ folder with help files required for version 0.0.16
– The RTC.SYS file – not specifically for NMI Navigator, but to get rid of the error message of a missing RTC.SYS file if you have it

The new version is available with one of these links:
– For ESXDOS 0.8.6: https://bytedelight.com/download/nmi_v0.0.16_esxdos086.zip
– For ESXDOS 0.8.7: https://bytedelight.com/download/nmi_v0.0.16_esxdos087.zip

Extract the files and copy them to the SYS folder of your DivMMC or DivIDE card.


Help menu

Once installed, press the NMI button and press H for all options!


Screenshots

The new NMI Navigator running on a DivMMC EnJOY! PRO ONE:

The Help-menus (by pressing ‘H’ in the NMI Navigator):

Info about the current version, ESXDOS version, and the machine it is running on is shown:

Easy poking! Finally!

Press ‘P’ and enter address and value:


ZX-HD page

Now online: the webpage about the ZX-HD!

With:

  • The history of the ZX-HD
  • Everything about the features (coming soon)
  • Manuals, firmware updates, etc (coming soon)
  • Troubleshooting (coming soon)

ZX-HD