
€39.66
Description
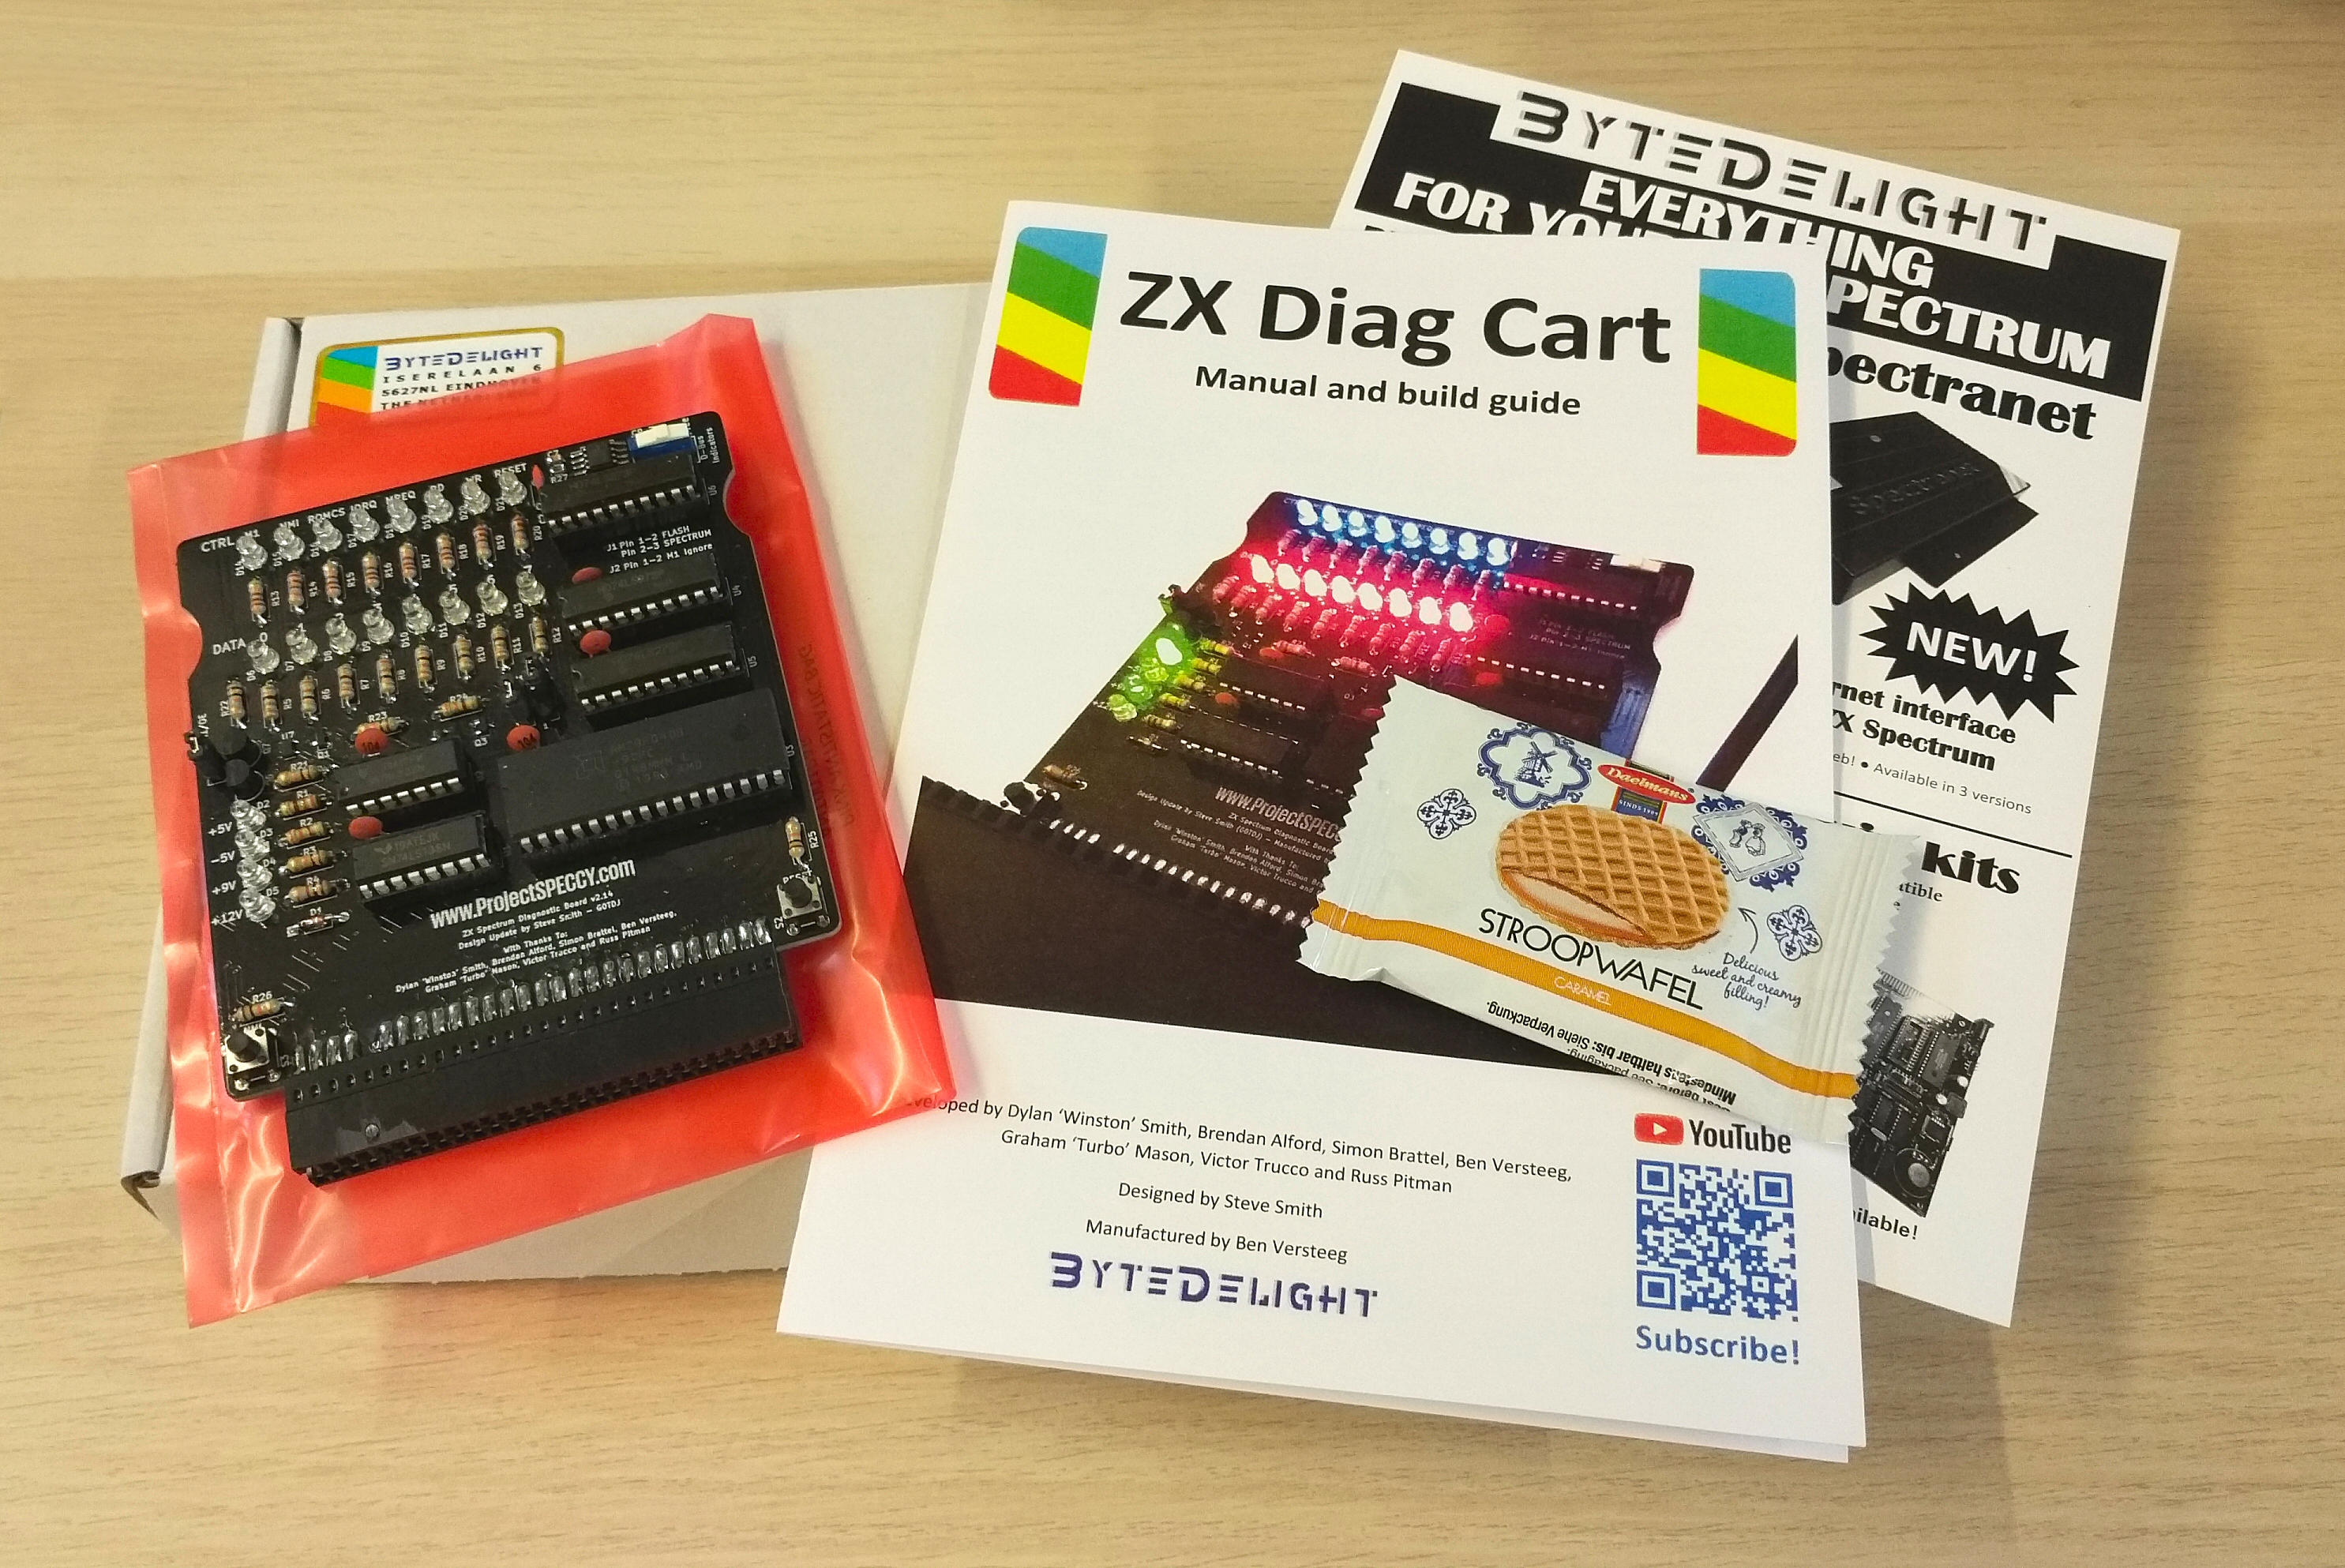
ZX Diag Cart – DIY kit
Update 6 March 2022: added link to community 3D printable frame for the ZX Diag Cart!
The ZX Diag Cart will visually show all kinds of details of your ZX Spectrum, which is both looking cool and useful at the same time!
It will make diagnosing defects a lot easier:
- Quickly check if voltages are present
- If there is a dataline ‘stuck’
- If the M1 line is working…
If you are thinking of repairing your own ZX Spectrum (any model, including many clones), this is the tool you must have!
DIY kit
The kit contains:
- The circuit board with SMD parts already assembled
- All parts in separately labeled bags with their part numbers for easy matching
- IC’s and sockets on anti-static foam
- The manual and DIY build guide
Hardware features
Autodetection of ZX Spectrum model
The ZX Diag Cart automatically detects to which ZX Spectrum model it is connected, so it can control the ROM signals on ZX Spectrum 16/48K, 128K+, +2, +2A or +3, and many clones.
LEDs
The ZX Diag Cart has 20 LEDs showing these groups of information:
– Control signals status, indicated by the blue LEDs
– Data lines status, indicated by the red LEDs
– Power lines status, indicated by the green LEDs
The speed of change of the LEDs is limited by a clever timing circuit, so it’s easier to see what signals are acting and which are stable
Slider switch
Slide it to the right to have the blue LEDs show the status of the data lines present on the edge connector.
Slide it to the left to have the blue LEDs show stages of the diagnostic software.
ROM1/OE jumper
This jumper is for compatibility with the Brazilian clones that use this line for audio.
When using a Brazilian ZX Spectrum clone (TK90X and TK95), disable the jumper (store it on one of the pins).
Enable this jumper for original ZX Spectrum models and other clones.
J1 jumper option – FLASH/SPECTRUM
When a jumper is present on pins 1-2, it will enable the integrated diagnostics software.
When a jumper is present on pins 2-3, it will have the ZX Spectrum boot as normal.
J2 jumper option – M1 Ignore / Normal
When a jumper is present on pins 1-2, it will ignore the M1 line in case it’s not working properly.
When a jumper is present on pins 2-3, it will use the M1 line.
Of course, when the M1 line of the Z80 CPU is failing, the Z80 CPU must be replaced!
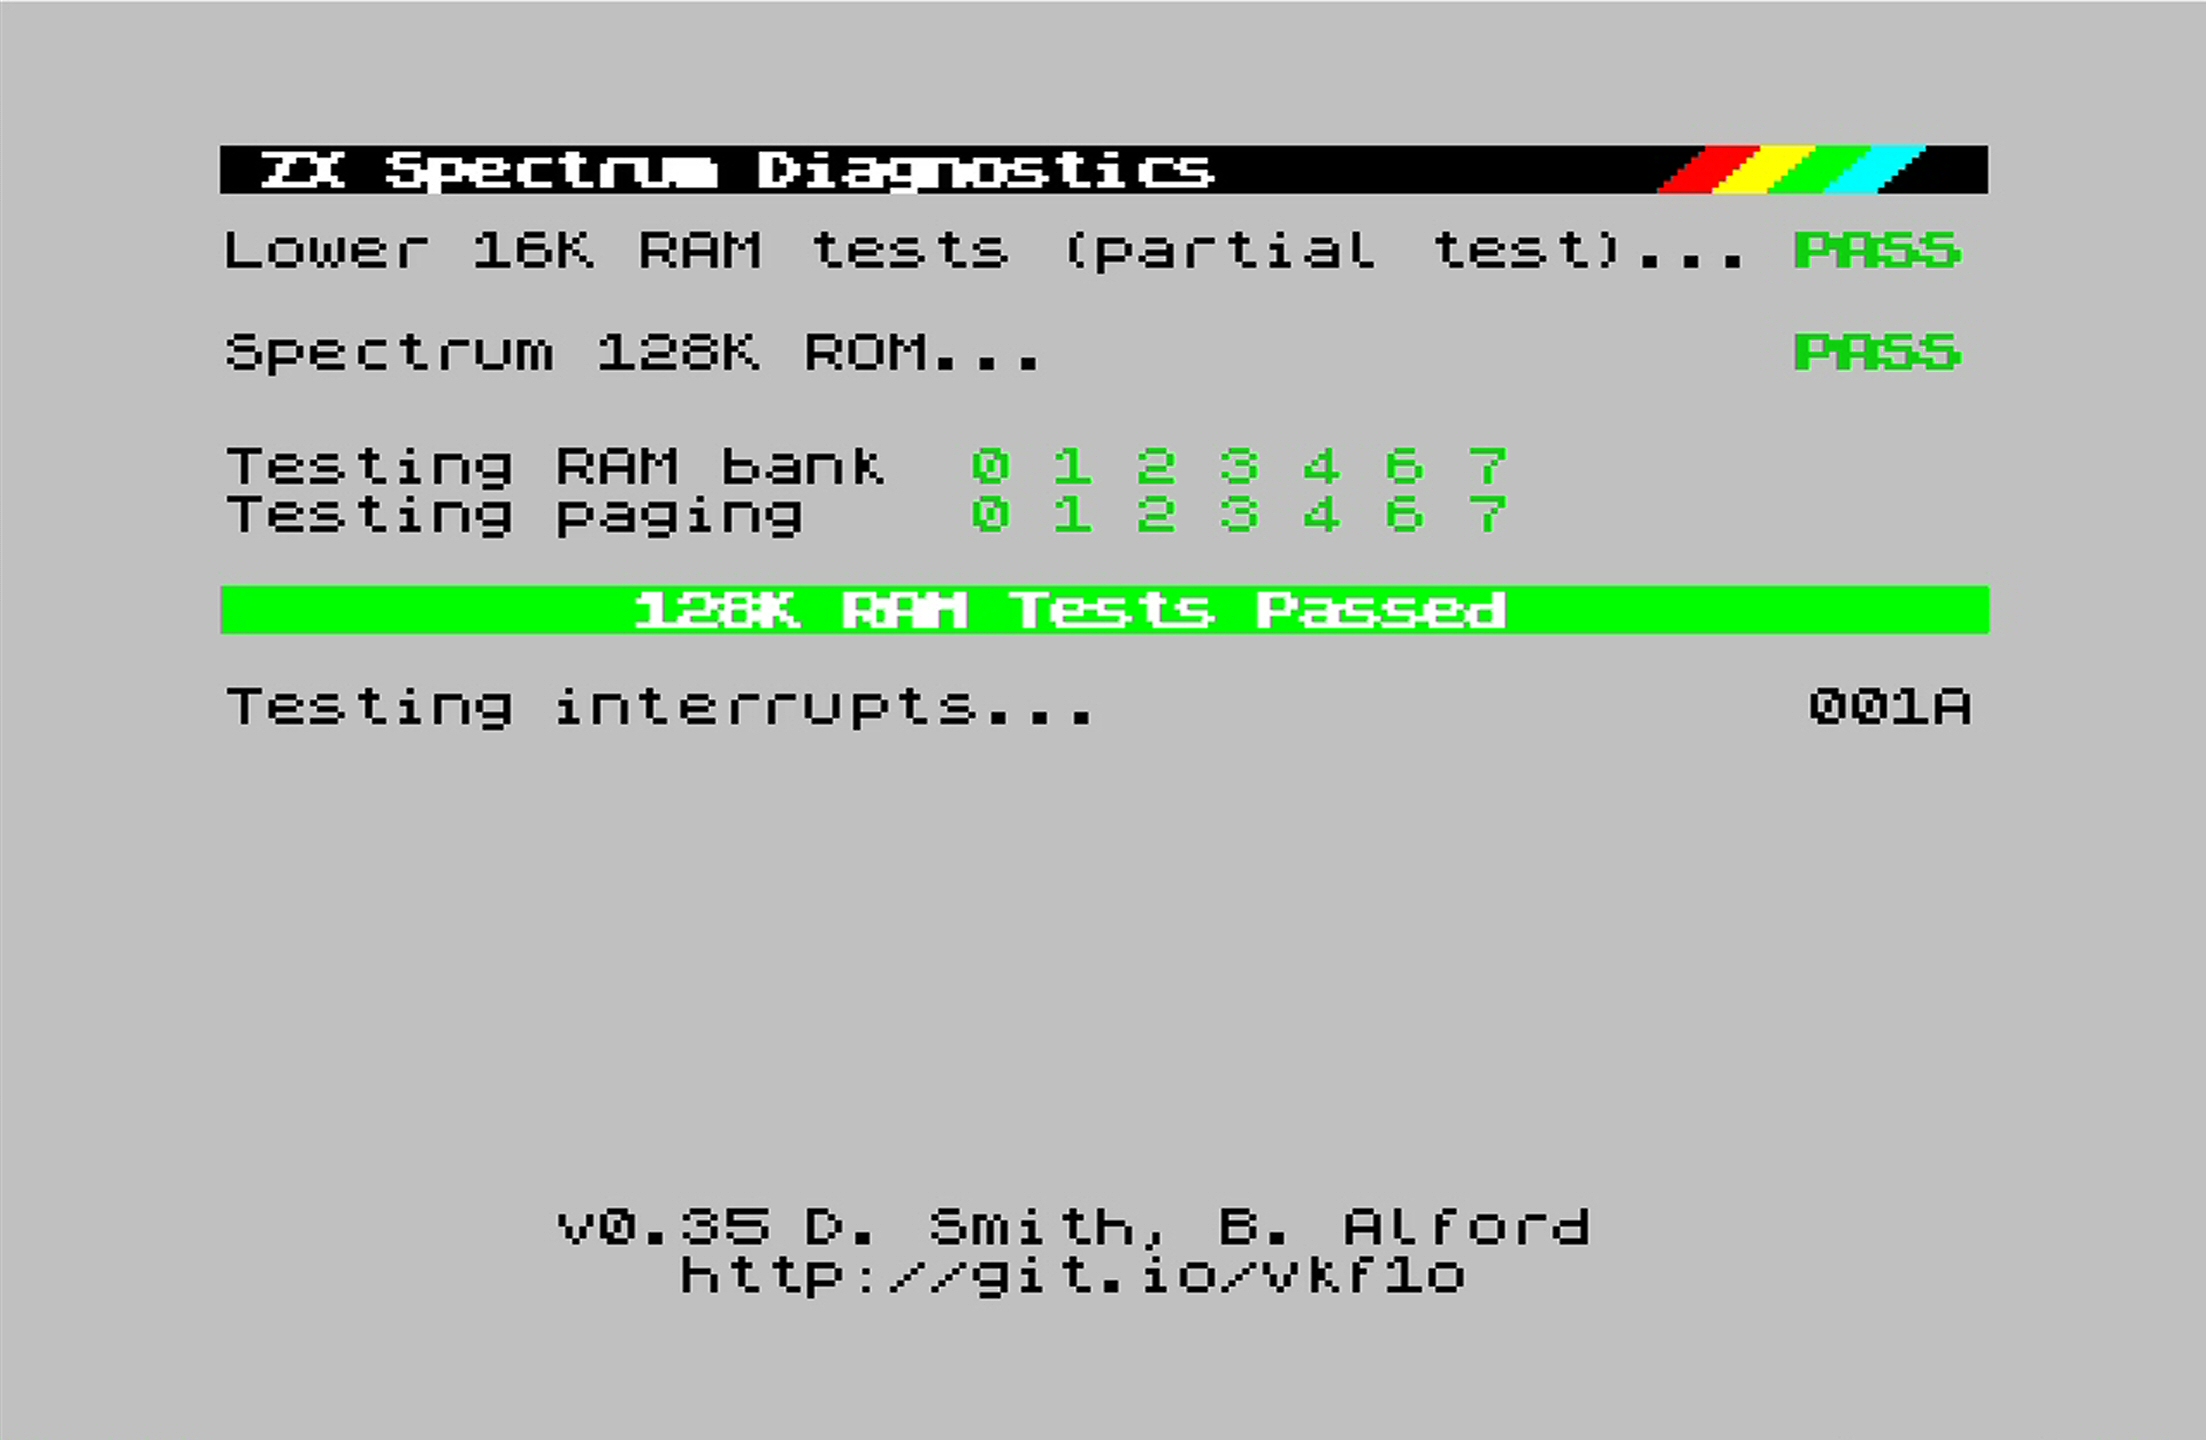
Integrated Diagnostic Tools
The ZX Diag Cart comes with the ZX Spectrum Diagnostics software, developed by Dylan Smith and Brendan Alford:
If lower ram fails, the software also shows border effects to indicate bad chips:

The manual containst much more information about how to debug such a situation.
The basic diagnostic tool tests:
- ZX Spectrum Internal ROM
- ZX Spectrum lower RAM
- ZX Spectrum upper RAM
- ZX Spectrum RAM paging*
- Interrupts
*With 128K models
There are more features that you can launch with a key-press directly after powering up – this is shown on screen.
Needed to assemble the kit
If you ordered the kit, you additionally need these tools to assemble it:
- Solder wire
- Soldering iron
- Side cutter to cut the legs of parts
- Coffee or tea – and a beer for when you’re finished
SMD parts
The SMD parts have already been soldered on with the DIY kit.
Firmware upgrade instructions available
Follow the intructions on this page to upgrade your Diag Cart to the latest firmware:
3D print design for frame
Richard shared this wonderful frame, to print yourself, if you prefer this instead of the rubber feet: https://www.prusaprinters.org/de/prints/138684-zx-diag-cart-case
Photos
Additional information
| Weight | 0.2 kg |
|---|
Related products
-
Sale!

Repair and refurbishment service for your ZX Spectrum +2 (grey model) board
€72.33 Add to cart -

*Inner-white* mug + duopack Jumbo Stroopwafels
€17.49 Add to cart -
Sale!

Repair and refurbishment service for your ZX Spectrum 128K+ ‘toastrack’ board
€84.00 Add to cart -
Sale!

Repair and refurbishment service for your ZX Spectrum 16K/48K board
€67.66 Add to cart
The diagnostics cart was easy to assemble, especially given the great step-by-step instructions. All parts are of high quality and fit together perfectly. I’ve used it a few times now, and it has been great in diagnosing basic problems, or confirming stable machines. Even used it with a Harlequin 48K!
Wow… I was really impressed by the completeness of the kit! All parts are sorted and labeled, Very clear and detailed instructions: Even a beginner should be able to assemble it. If you have some soldering skills and a soldering iron with a fine tip, there should be no problem getting this kit to work.
Highly recommended!
The kit was put together so nicely and carefully. The difficult SMD parts are already presoldered, the other parts are easy to solder in. Even the legs of the resistors were pre-bent and only needed to be put into the holes. It was fun to build this cartridge.
I have designed a simple 3D printed frame, in case you don’t want to use the rubber feet: https://www.prusaprinters.org/de/prints/138684-zx-diag-cart-case
Thank you for quickly forwarding the second ZX Diag Cart and the small gifts.
In the meantime I have finished the video and you can watch it here: https://youtu.be/yu2b3dQ8VpQ
Thank you very much for the great work.